ARTIST SPOTLIGHT3
Featured on Alias Teaching Tools DVD from Staffordshire Library entitled Hyper-Realistic Modeling. The Instructor was Jeff Unay. I’m now aware that Autodesk brought Alias in January 2006. Hence this is using V. 6 Maya!
The following topics are explored on the DVD:
Ø Creature Pre-Production
Ø Poly Box Modeling
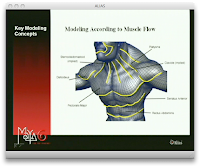
Ø Modeling according to muscle Flow
Ø Advanced PolyTools/Workflow Techniques
Name: Jeff Unay
Email: jeffunay@gmail.com
Born: Elmhust, Illinois USA
Residing: Wellington, New Zealand
Jeff Unay's professional art career began designing scratch-off lottery tickets and multimedia for the Louisiana Lottery Corp. That experience helped spawn a strong passion for computer graphics. His 2d work soon developed in to 3d work, where he would later be found working on creating creatures for the game "Quake 4". Jeff's artistic inspirations have always been deeply rooted in the designs found in the films he grew up watching repeatedly, especially "Conan the Barbarian", "Clash of the Titans" and "Aliens". Today, he's living out his childhood dreams of developing characters and creatures for film, television and video games. Jeff is currently a Freelance Artist/Author and Facial Lead on "Avatar" at Weta Digital. And as a big believer in sharing his knowledge and experiences with others in the computer graphics community, in his spare time Jeff continues to author books, podcasts, give presentations, teach courses and mentor students.
DVD Explored:
 |
The areas on the DVD that appeared to apply to my learning at present relate to:
Poly Box Modeling Ø Block Modeling Almost always start with a cube.
Introduces artist & brush – Not familiar with this (look Into) Allowed Jeff to pull & push areas of the model to define its shape. Hands & Feet: Modeled the thumb, as that is unique. Then modeled one finger in a decent amount of detail. Once happy he ‘duplicated’ that for each of the other fingers/toes & then scaled them accordingly. Once a character has been formed Jeff would then split the model up into appropriate body parts, hand, lower arm, upper arm, torso, head, upper & lower leg etc. This allows him to concentrate on each element in enough detail without worrying about his edge loops running into each other.
Jeff Recommends: Default T pose: Creating the model in the T pose Scale: Establish Overall Scale early on.
Ø Working with Image Planes
This has changed a lot from the version of Maya this DVD was made (6) hence although the end results were the same how you achieved them differs in the recent versions so I couldn’t gain too much from this. Jeff says he has known up-to 20 image planes being used in a production where as I seemed to struggle with 3! I need to practice matching up the image planes/camera’s as I struggled with this in practice.
Using Image Projections as a modeling tool. Struggled to Follow this!
Increasing Resolution once image planes are set: Don’t think I’ve got this far with Maya or my modeling.
Ø Model clean-up
Ø Modeling according to muscle Flow
This screen grab highlights the way Jeff considers the muscle within the model at the offset and this shapes the way he models the character. This shows how Jeff’s education into the physical make up (anatomy) of the human body supports what will happen in 3D. This took me back to my Physical Education lessons from back in the day when my knowledge of the human body was good.
The arm in particular was complex as many muscles over lap and Jeff admitted that you must accept there must be some give & take on what gets included and what gets left out, not forgetting the creature itself has a large bearing on the choice of muscles. The other way to look at it was in terms of skin texture. Model to muscles or skin surface? Either way it’s a trade off! Jeff gives the example of the oblique’s and how they curve across the torso but in modeling working diagonally doesn’t work, horizontal is best! So the trade off is that for 3D you need to work with the tools rather than the reality. Uniformly spaced Geometry Helps with the pipeline and rigging & texturing if the evenly spaced geometry Quad Topology
I will re-visit this DVD, as it seemed a much smoother workflow and casual, while informative. If it were this easy I’d be flying at this point not struggling though. |


No comments:
Post a Comment